
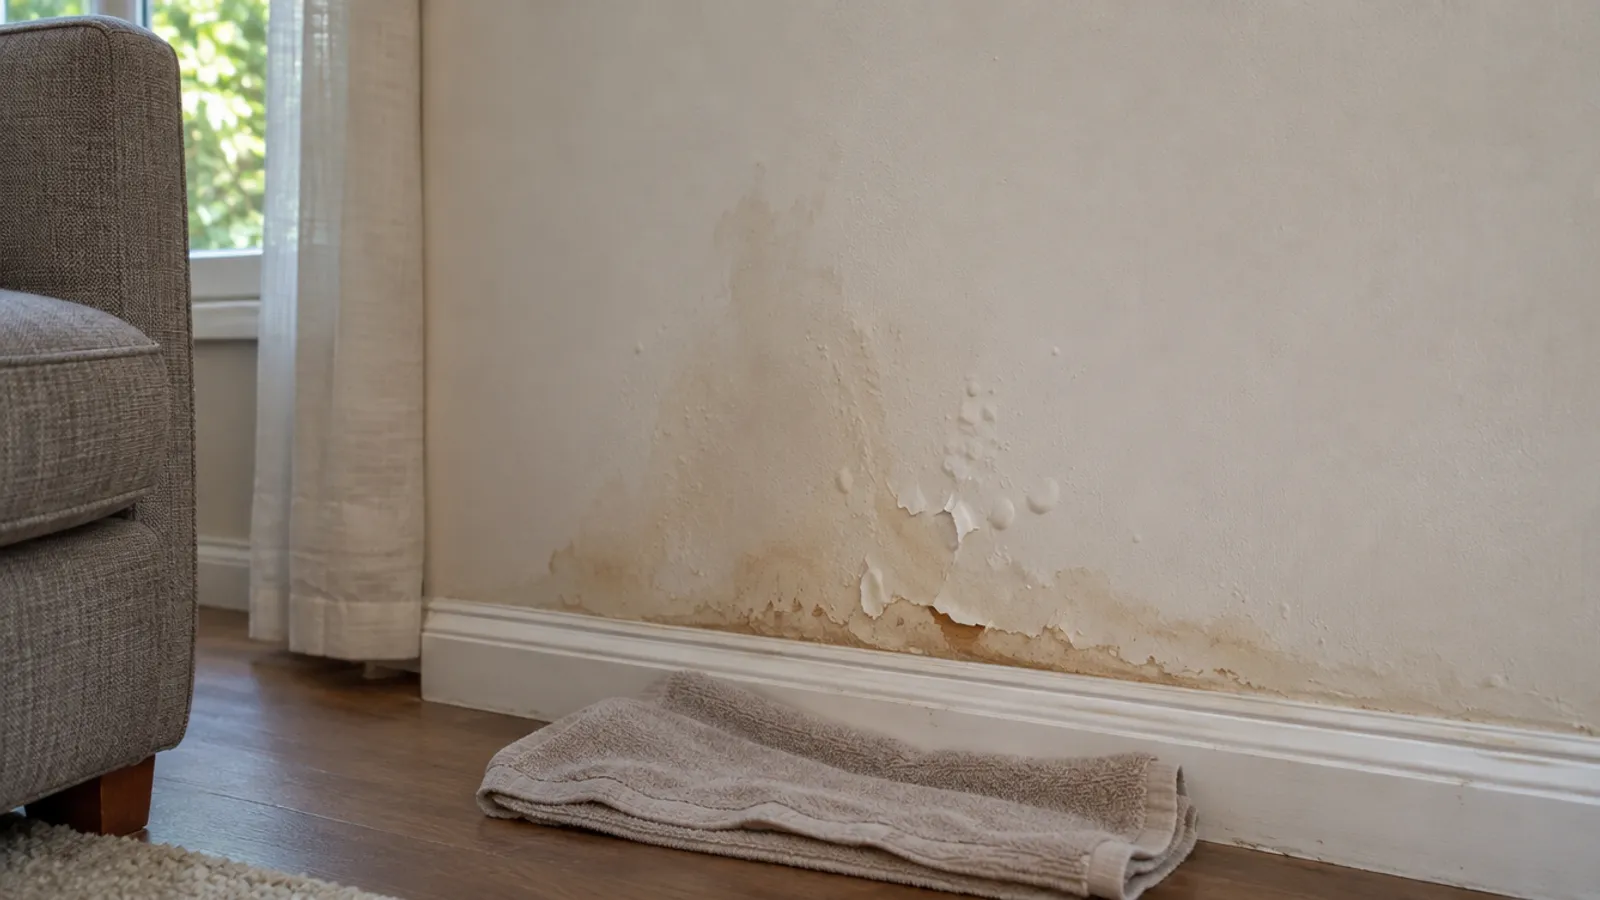
To find a water leak behind a wall, look for water stains, bubbling paint and soft drywall, then turn off every fixture and watch the water meter. Pinpoint the wet spot with a moisture meter and an inspection hole, open the wall between studs, fix the pipe, dry it out, and patch the wall or fit an access panel.
The steps suit any wall leak; for a shower wall, see our guide to a leak behind a shower wall.
What are the signs of a water leak behind walls?
Most hidden leaks show up slowly: water runs down inside the wall and soaks the drywall from the bottom. The longer a hidden water leak runs, the more water damage it does, and small repairs turn into expensive problems: rotted framing, mold and ruined flooring. Act on small warning signs before further damage spreads.
Visual signs: water stains, bubbling paint and peeling paint
The obvious signs are on the surface:
- Water stains that grow, often from the baseboard up or on the ceiling. Ceiling stains below a bathroom point to the same plumbing system.
- Bubbling paint and peeling paint, where trapped water pushes the paint off the drywall.
- Damp spots and dark areas that feel cool and never quite dry.
- Swollen baseboards, cupped floor boards or standing water along the bottom of the wall.
- Mold on the wall, the baseboard or the back of a cabinet.
Subtle signs you can smell, hear or feel
- A musty smell in one specific room. Musty odors mean moisture is feeding mold you can't see.
- Water dripping or running inside the wall when everything is off.
- Drywall that feels soft or crumbles when you press it.
- A water bill that climbs while your water usage stays the same.
Two or three of these subtle signs together are reason enough to test for water leaks behind walls.
Is the leak inside the wall, or is water getting in from outside?
Not every wet wall is a plumbing leak; the signs of water damage from rain or condensation look the same. When the wall gets wet tells you a lot:
| Signs you see | Likely source | How to check |
|---|---|---|
| Wet all the time, meter moves with everything off | A plumbing leak in a supply pipe or fitting | The water meter test below |
| Wet only after a sink, shower, tub or washer drains | A plumbing leak in a drain line or fixture seal | Run one fixture at a time and check the wet spot |
| A stain on an exterior wall that grows after rain | Roof leaks, clogged gutters, flashing or siding | Look outside, above the stain |
| Damp in humid weather, meter still | A cold water line sweating | Insulate the line |
Roof leaks show high on a wall or on the ceiling; water from gutters or wet soil shows low, or through a basement wall. A stain that grows on dry days next to a bathroom, kitchen, laundry room or water heater is most likely a water leak inside the wall.
How do you confirm a hidden water leak with the water meter?
The water meter test confirms a hidden water leak in a supply line, the pressurized part of the plumbing system. A wall leak on a drain only shows while a fixture runs, so the meter won't catch it.
- Stop all water use: faucets, showers, toilets refilling, washing machines, the dishwasher, an ice maker and any irrigation.
- Find the water meter: often in the basement or a utility room where the main line comes in, or outside in a box near the street.
- Watch the leak indicator, a small triangle or star-shaped wheel on many meters. Even a small leak turns it.
- If there's no indicator, note the reading, leave everything off for a couple of hours and read it again.
- If the meter is outside, close the main shut-off valve in the house. If the meter still moves, the leak is in the line to the house, not behind walls.
Your water bill is a second check: a steady rise in water usage against the same months last year is one of the warning signs of a slow leak. Once you've confirmed a supply leak, keep the water off at the main between tests to prevent further damage.
Rule out toilet leaks first
A worn flapper is a small leak too: it moves the meter and raises the water bill, and toilet leaks take a minute to check. Put a few drops of food coloring in the toilet tank, don't flush, and look at the bowl later. If the color shows up, fix the flapper and repeat the meter test.
How do you find the leak without tearing the wall open?
The sooner you address leaks, the less drywall you cut out. Aim for one small hole in the right place.
Where do hidden leaks usually start?
Hidden leaks start near plumbing fixtures: water lines and drains behind walls run to them, so a water leak inside a wall is rarely far from one. Check what plumbing is on the other side, and above:
- a bathroom: the sink and toilet supply valves, the tub or shower valve, the shower drain;
- a kitchen: the sink supply lines, the dishwasher connection, the drain line, and the thin plumbing line that feeds a refrigerator's ice maker;
- a laundry room: the washing machine valves and the standpipe drain;
- a water heater: its connections and relief line;
- a bathroom upstairs, which can leak down into the wall or the ceiling below.
Water runs down and along the framing, so the wet spot and the water damage are usually below the leak. Search above and around the stain, because the leak is rarely right behind it.
Map the wet spot with a moisture meter or infrared camera
A moisture meter reads moisture levels in drywall and wood, through two pins or a pad. Take a reading on a dry part of the same wall first, then work outward from the stain and any damp spots in a grid, marking high readings in pencil; follow the manufacturer's instructions for reading the scale. An infrared camera shows surface temperature, not water: wet drywall usually reads cooler, and a leaking hot water line can show as a warm streak. These non-invasive tools narrow the search for hidden leaks, but none of them sees through the wall. If you can't find a hidden plumbing leak, a plumber can add acoustic listening gear and pressure-test single water lines.
Cut a small inspection hole
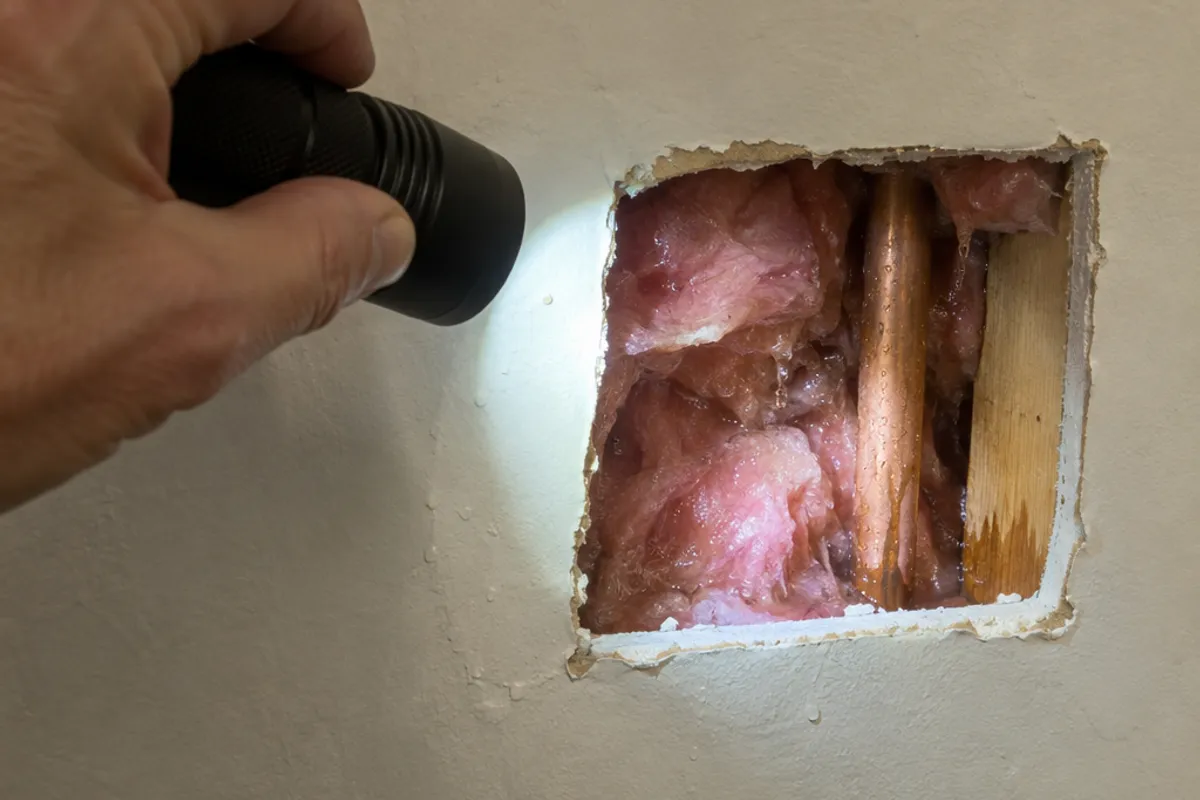
When the readings point to one stud bay, cut a small square hole at the wettest spot. Avoid cutting near outlets, switches and light fixtures, where cables run. Lift the piece out and look in with a flashlight for drips, wet insulation and mold. Keep the piece: a hole in the wrong place is an easy patch.
How do you open the wall safely?
Shut off the main or additional shut-off valves
Close the valve that feeds the leaking line first. For one fixture, the additional shut-off valves under a sink or behind a toilet or washing machine may be enough. For a pipe inside the wall, shut off the water to the entire home at the main valve; see where to find the water shut-off valve. Then open a faucet on the lowest floor to let the pressure out.
Turn off the power to that wall
If water has reached an outlet, switch or light fixture, don't touch it. Turn off the circuits in that wall at the breaker and confirm with a voltage tester before you cut. Have a licensed electrician check anything electrical that got wet. Soldering, main-line work and work near a gas line may need a licensed plumber and a permit where you live.
Mark a rectangle around the inspection hole that takes in the leak, with its sides between the studs. Score it with a utility knife, then cut with a jab saw in short, shallow strokes so the blade can't reach pipes or cables. If you may close it with an access panel later, cut it to suit one (see the table below).
How do you fix a leaking pipe behind a wall?
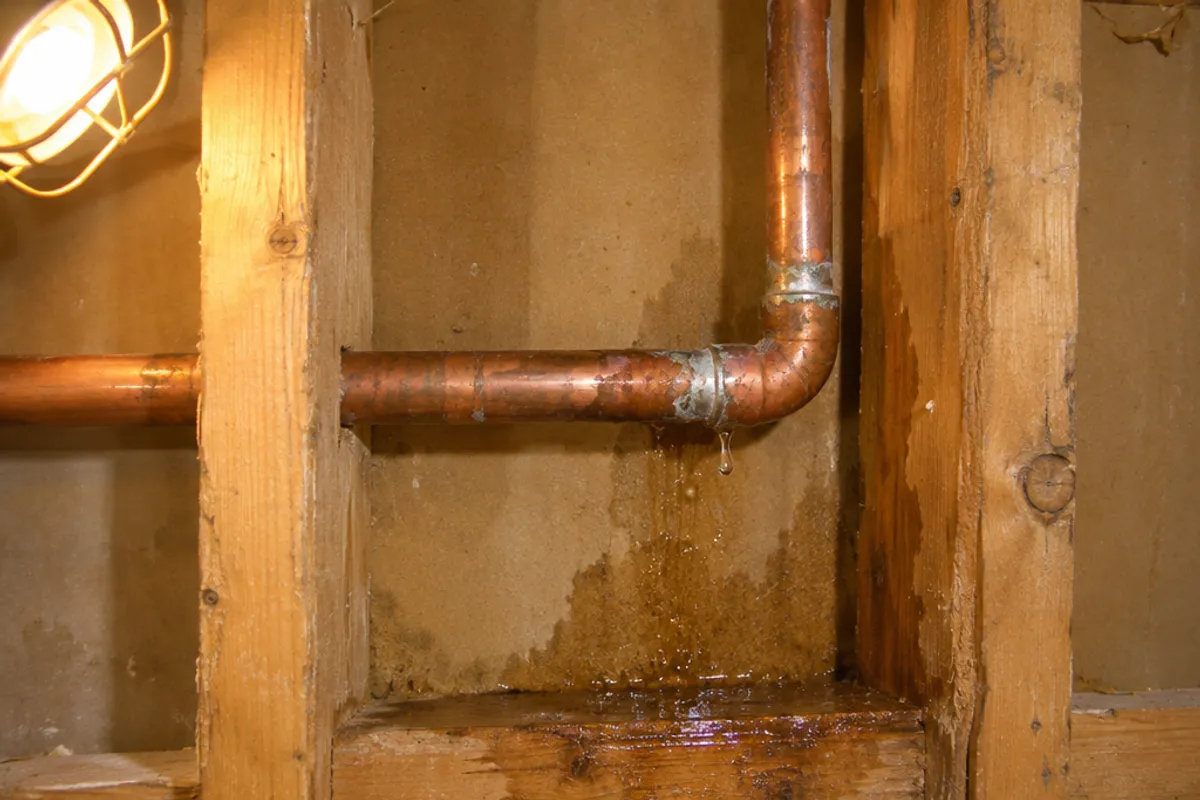
A plumbing leak usually starts at a joint, so dry the pipe, turn the water on for a moment and watch where it beads up. Then:
- A loose fitting. A weeping threaded or compression fitting can sometimes be tightened slightly; hold the other side with a second wrench.
- A pinhole or short damaged length. Cut it out and join the ends with a repair coupling made for your pipe (copper, PEX or CPVC), following its manufacturer's instructions, and check it's allowed inside a closed wall where you live.
- Corrosion. Pipes behind walls that leak in one place may have other weak spots, so replace a longer section or have a plumber check the run.
- A drain line. Reseal a slip joint at the trap, or cut out a cracked or glued fitting and replace it.
- Burst pipes. Replace the split length and deal with the cold spot that froze it.
In cold regions such as Alberta, the Maritimes and the northern US states, pipes in exterior walls are the ones that freeze: keep a repaired line on the warm side of the insulation where you can, and ask a plumber about rerouting one that keeps freezing.
Then run the fixtures on that line, repeat the water meter test, and leave the wall open long enough to be sure the leak has stopped and the joint stays dry.
How do you dry the wall and prevent mold growth?
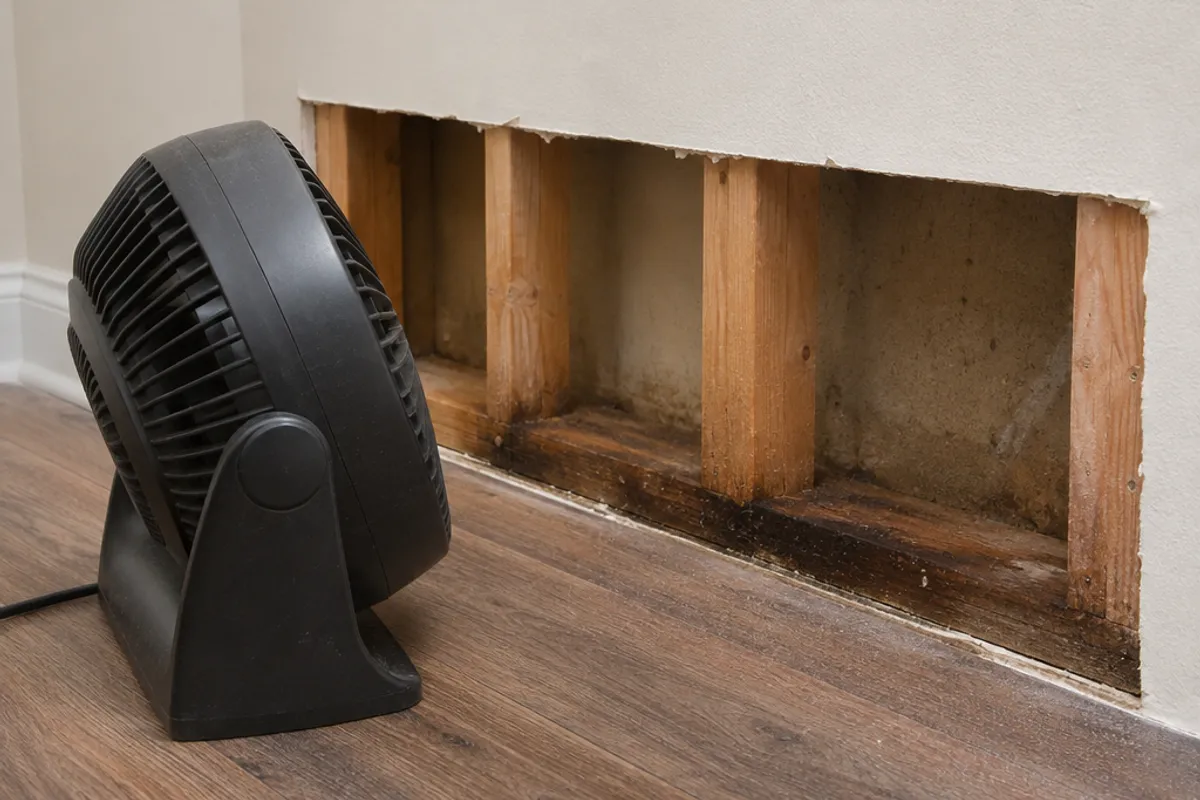
Leave the wall open until the leak is fixed and the water damage is dry. A closed, damp cavity invites mold growth on the back of the drywall and in the framing, where you won't see it until musty odors come back.
- Bag soaked insulation, and put in new batts once the cavity is dry.
- Cut out drywall that is soft, crumbly or stained on the back.
- Run fans into the opening and a dehumidifier in the room.
- Check the studs and bottom plate with the moisture meter each day. Close up only when the readings match a dry wall.
- If mold covers a large area or comes back, or someone in the house has asthma or allergies, call a mold remediation professional.
Mold left untreated keeps spreading, and that matters for your family's health as well as the house. Water damage that reached the floor needs the same drying before new flooring goes down.
How do you close the wall: patch it or fit an access panel?
Once the water leak is fixed, the water damage is dry and there's no sign of mold, close the wall. For a one-off plumbing leak in a straight run of pipe, patch the drywall like any other hole (see patching a hole in drywall). If the opening sits over something you may need again, such as a shut-off valve, a repair coupling or a drain connection, fit an access panel instead. From our catalog:
| Model | Type | Opening | Size on the wall |
|---|---|---|---|
| SAP1414 | Removable spring-loaded panel | Fits openings from 10 × 10 to 14 × 14 in | 16 × 16 in cover |
| PAD1212 | Hinged door | Cut-out and service opening 10.35 × 10.35 in (estimated), rounded corners | 12 × 12 in overall |
The SAP1414 suits an opening you've already cut, if it's inside its range; its wire-loop spring holds the removable cover. The PAD1212 suits a valve you'll open often, such as a shower valve reached from the next room: its frame screws onto the wall over a cut-out the size of its service opening, traced from the 1:1 template on its product page, with the screws that come with the door.
Our plastic access panels and doors are not fire-rated, and we publish no water-resistance rating for them, so don't fit one in a fire separation, such as the wall between a house and an attached garage.
Keep them out of a wall that gets wet, too. Compare them on the plumbing access panels page and the drywall access panels page.
Ask your local building department whether your pipe repair needs a permit and an inspection before you close the wall.
Measure before you order: our guide on how to measure for an access panel shows how, and the access panel size chart compares every opening and cover.